The Hidden Weak Spot in Your Renovation – Insulating window reveals
There’s a critical detail that often slips our mind, and that’s the junctions in particular insulating window reveals. When it comes to upgrading a home’s energy performance, most people focus on the big stuff – new windows, fresh insulation, maybe new appliances. Job done, right? Not quite.
Whether it’s where the wall meets the roof, the floor, or as we’re focusing on in this short blog, where the wall meets the window. These are the spots where performance can quietly unravel if they’re not treated with care.
Types of heat loss
Heat loss generally falls into two categories. Heat loss through conduction (the process by which heat is directly transmitted through the material of a substance when there is a difference of temperature or between adjoining regions, without movement of the material) and convection (process by which heat is transferred by movement of a heated fluid such as air or water).
One of the most commonly overlooked details? Reducing conductive heat loss through the window reveals. It may seem minor, but how you insulate the area around your windows can mean the difference between a good upgrade… and a great one.
Conductive heat loss visual modelling
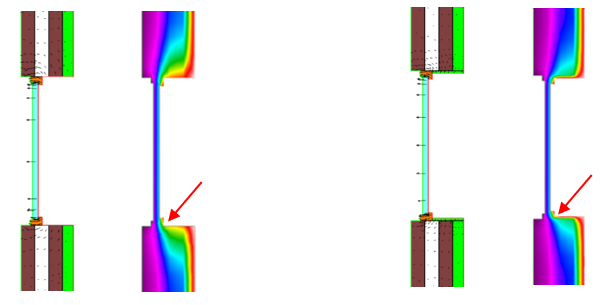
We’ve prepared a few clear, side-by-side diagrams to show the difference between internal and external wall insulation and the impact of insulating the window reveals using a 2D heat transfer analysis program.
Each image is a simplified cross-section of a typical cavity wall with a window installed. The brickwork on either side of the cavity is shown in brown, while the insulation is highlighted in green for clarity. The window frames are shown in orange whilst light blue represents the glass. Each example comes in pairs. With two different indicators.
The first of the two is a diagram to see the cross section with small black heat flow vectors imposed over. These arrows show the flow of heat energy per unit area per unit time. The larger the arrow, the more heat is escaping. The arrow’s direction indicates where the heat is moving.
The second diagram of the same cross section is an infrared-style temperature diagram. These reveals how temperature varies through the wall assembly. Use the legend to interpret the subtle differences in temperature gradients across each scenario.
Un-insulation reveals and walls.
Example 1 shows a simplified cross-section of a cavity wall without any insulation. Notice the large heat flow arrows and how they move almost directly perpendicular to the wall surface.
The medium-temperature light blue on the infrared diagram cuts straight through the centre of the wall, showing a steady and continuous temperature gradient from inside to outside. This clearly illustrates how, in the absence of insulation, heat moves freely through the entire wall structure.

Insulating window reveals on EWI
Examples 2 and 3 both show a wall fitted with external insulation (EWI). This can be seen with the green insulation to the left of the wall. Example 2 features no insulation in the window reveal, while Example 3 includes reveal insulation. The insulation meets the window frame in this case
The first thing to notice is, in both cases the heat flux vectors are smaller through the wall than tan example 1, indicating that less heat is escaping overall. The arrows are also less perpendicular to the wall surfaces due to increased resistance to heat flow thanks to the insulation. Instead, the heat flow curves toward the window area.
Why? Because heat always follows the path of least resistance.
In Example 2, the arrows bend toward the uninsulated reveal and pass into the exposed masonry, which is in direct contact with the outside air, allowing more heat to escape.
In Example 3, with insulation wrapping into the reveal, the arrows are even smaller and shift toward the window frame itself, showing a more controlled and minimised heat loss at this junction.
 Due to the external insulation resisting the heat energy loss at the last instant before it reaches the exterior of the wall. The medium-temperature light blue zone cuts straight through the glazing but then is moves closer to the exterior of the wall. The insulation is doing its job, resisting the flow of heat from inside to outside. As a result, the temperature drop happens mostly within the insulation layer, which is now on the outside of the structure. The internal part of the wall stays much warmer. The surface around uninsulated frames remain at a higher temperature, Pink instead of purple at the corner where the reveal meets the frame.
Insulating window reveal on IWI
Examples 4 and 5 illustrate internal wall insulation (IWI), the green insulation being on the right of the wall. Compared to an uninsulated wall, the heat flow vectors are more curved again, particularly around the window frame and reveals on the inside this time. This happens because the internal insulation creates a strong barrier along the wall surface, forcing the heat to find other paths, primarily through less insulated junctions.
In both cases, the overall heat loss is significantly reduced, especially in Example 5, where the internal reveals are also insulated. These further prevent heat from escaping around the window edge.
The result? Heat is redirected through the window frame itself, which becomes the weakest-performing element in the wall cross-section. These examples highlight the importance of a continuous insulation layer, especially at junctions, to minimise thermal bridging and maximize performance.

Internal insulation is stopping the heat energy at the interior surface before it gets to the wall. As a result, the light blue moves toward the inside of the wall, the opposite to what occurs with external insulation, because the temperature drop happens mostly on the inside, within the insulation layer itself
There is more internal surface at the junction between frame and the reveals with a low temperate where the internal reveals are not insulated. Red instead of yellow where the reveal is insulated. The existing cavity wall structure now sits on the cold side of the insulation, closer to the external temperature.
Do not forget moisture
Many a building professional are aware of these simple theories but there is another consideration.
Moisture both carried in the air and in liquid form can prove to be a challenging consideration. At any given temperature air has a particular ability and maximum capacity for carrying water. And as the warm air travels through the wall reducing in temperature. The water carrying capacity of the air reduces often to a point where the water can no longer be carried. This is the due point and the water condenses to for liquid in your wall. When insulating internally it is also crucial to do the upmost to prevent that vapour condensation point to be in the wall between layers. Uninsulated reveals are particularly susceptible to condensation as the surface at those points are significantly cooler that the other surface area on the wall. Meaning that all the vapour in the entire room could condense at this particularly susceptible location.
This same phenomenon is likely in poor preforming windows where the glazing provides little resistance to the cold temperature outside and the surface of the glass is cold. If you’re not careful that could be below the vapour condensation point. And moisture builds up.
Resolve custom details
Optimising construction details is where Resolve excels. Not only will it upgrade your low energy renovation from good to great saving you money and energy for the duration of your building in operation, but we can mitigate any risk of intersitial condensation or black mould. We provide best practise advice designed to lower the risk of any condensation issues whilst optimising the energy saving of your building. The modelling process allows for a measured science-based decision process for any choice of materials or change in design.
How much energy will it save?
How much does it cost?
Is it worth it?
Can I save more energy?
All these questions we can diligently answer to make your decision process easier.

